
What is I2P?
I2P or the Invisible Internet Project is an anonymous overlay network that runs ontop of TCP/IPv4/v6. What it provides is a way for you to host port-based services
so anything that can speak TCP for example, like a mail server, IRC server or maybe even ncat -l -p 2121, in a way such that people will be able to access it without
figuring out who is hosting it. This anonymizing property is bidirectional, the server handling client connections will not be able to find out who the client is.
In this way we have a very anonymous network that we can use to run our TCP-based applications over transparently. How exactly? Well I will explain this in the following
section.
I2P let’s you protect yourself when you need it - from the prying eyes such as African governments.
How does I2P work
I’m not going to be expalining the internals or even some of the surface level aspects of I2P - all I will be explaining is the very basics that allow you to setup a tunnel from your I2P node to another node’s. But wait, tunnel - what’s that?
Hosting a service on I2P
Let’s make an example, Alice wants to setup a web server hosting documents that he got from a recent ANC (African National Congress - or African National Cancer) leaks
or perhaps he wants to run a drug marketplace or maybe if run a Monero node - basically he wants liberty okay. Now he wants to host this over I2P. So he sets up
a web server using something like apache2 for example and binds it then to 127.0.0.1:80 (so it’s listening on port 80 and only accepting connections from localhost).
Now what he will do is configure I2P to setup a tunnel to that address and port which would be 127.0.0.1 and 80 respectively. Once you restart I2P with this new
tunnel configuration it will generate a key for that tunnel - this is what you must provide to your client, Bob, if they want to connect.
Accessing services hosted on I2P
Say now Bob wants to now access Alice’s web server. Now what he will do is, instead of configuring a server tunnel (like Alice did), will configure a client tunnel whereby you will specify the destination (this will be the key outputted from creating the server side tunnel), the next things you specify are the address you want the service to be available on your side (bound to) along with the port (these are up to your descretion).
Setting up your own I2P node
By running an I2P node, even if you don’t use it, it helps the I2P network grow and you help route traffic - so it is a noble thing to do.
Build I2P from source
First you will be needing the following dependencies:
sudo apt update
sudo apt install git -y

# Modified and taken from (https://i2pd.readthedocs.io/en/latest/devs/building/unix/#debianubuntu)
sudo apt-get install \
    libboost-date-time-dev \
    libboost-filesystem-dev \
    libboost-program-options-dev \
    libboost-system-dev \
    libssl-dev \
    zlib1g-dev -y
Now we will build the source code:
git clone https://github.com/PurpleI2P/i2pd.git
cd i2pd
make
Now that we’re done with that you can either keep the git repo there for easy updating or delete it but make sure your save the i2pd/i2pd executable that was produced:
mv i2pd ../i2pd
cd ../

# Delete the source files
rm -rf i2pd
Basic configuration
Before we configure anything let’s make sure i2pd will start. If you run the following:
i2pd
You should see a similiar output:
pi@raspberrypi:~/i2pd $ ./i2pd
17:58:58@929/none - i2pd v2.38.0 starting
17:58:59@929/warn - Family: Can't load family certificates from /home/pi/.i2pd/certificates/family
17:58:59@929/warn - Reseed: Can't load reseed certificates from /home/pi/.i2pd/certificates/reseed
17:58:59@929/error - RouterInfo: Can't open file
17:58:59@929/warn - NetIface: interface with yggdrasil network address not found
17:59:04@564/warn - Transports: 15 ephemeral keys generated at the time
17:59:04@929/warn - Addressbook: Can't open /home/pi/.i2pd/addressbook/addresses.csv
17:59:04@929/error - Addressbook: resetting eTags
17:59:04@929/warn - Clients: Can't read /home/pi/.i2pd/tunnels.conf: /home/pi/.i2pd/tunnels.conf: cannot open file
17:59:04@513/warn - SSU: Missing fragments from 0 to 0 of message 2919008912
17:59:04@960/warn - NTCP2: SessionCreated read error: End of file
17:59:05@960/warn - NTCP2: SessionCreated read error: End of file
17:59:05@513/warn - SSU: MAC verification failed 255 bytes from 188.187.169.129:25143
17:59:05@960/warn - NTCP2: SessionCreated read error: End of file
17:59:06@960/warn - NTCP2: SessionCreated read error: End of file
17:59:06@647/warn - Profiling: no profile yet for qJpd0JVLk~m1cDsY5f5wcgXyEUwR3MreOL~kDHa5f1U=
Now let’s create a configuration file in ~/.i2pd/i2pd.conf:
touch ~/.i2pd/i2pd.conf
Now there are a few things we can add in this file but we will get to that later. For now the default, an empty file (or none even), will suffice.
Next up, let’s configure some tunnels.
Adding some tunnels
For my setup I would like to setup tunnels for quite a few services I have running on my home network, specifically I’d like to setup the following:
Here the Host is the IP/DNS of the machine running the service and the Port is the port the service is running on.
| Service | Host | Port |
|---|---|---|
| Web server | fdd2:cbf2:61bd:0:0:0:0:2 | 80 |
| lockdown.bnet IRC server (no TLS) | fd08:8441:e254:0:0:0:0:2 | 6667 |
| lockdown.bnet IRC server (TLS) | fd08:8441:e254:0:0:0:0:2 | 6697 |
| Deavmi’s Mumble Shack | fd08:8441:e254:0:0:0:0:2 | 64738 |
To do this you will ned to create a file named ~/.i2pd/tunnels.conf:
touch ~/.i2pd/tunnels.conf
Now I to add a server tunnel you use the following syntax:
[tunnel name]
type=server
host=<address of host>
port=<port of host>
keys=<keyfile>
- The
typefield is set toserverfor a server tunnel - The
<address of host>is the address of our web server - The
<port of host>is the port of our web server - The
<keyfile>will be a path that will gold the key file which will be assigned to this tunnel, from this, and via the web interface, we will be able to derive our destination address which we can give to a client it they want to setup a *client tunnel to our web server
Now let’s setup my web server:
[deavmi's webserver]
type=server
address=fdd2:cbf2:61bd:0:0:0:0:2
port=80
keys=deavmiWebServer.dat
And then the remaining services:
[deavmi's homepage]
type=server
host=fdd2:cbf2:61bd:0:0:0:0:2
port=80
keys=deavmiWebServer.dat

[lockdown.bnet (no encryption)]
type=server
host=fd08:8441:e254:0:0:0:0:2
port=6667
keys=lockdownBNET.dat

[lockdown.bnet (SSL/TLS)]
type=server
host=fd08:8441:e254:0:0:0:0:2
port=6697
keys=lockdownBNETTLS.dat

[deavmi's MumbleShack]
type=server
host=fd08:8441:e254:0:0:0:0:2
port=64738
keys=mumbleShack.dat
A small note, whilst doing this orignal let me know that if you wanted faster crypto then for each server tunnel (the client tunnels do this by default) you should enable the following:
i2cp.leaseSetEncType=0,4
So for example, each of my four tunnels which looked like:
[deavmi's webserver]
type=server
address=fdd2:cbf2:61bd:0:0:0:0:2
port=80
keys=deavmiWebServer.dat
Should now look like this:
[deavmi's webserver]
type=server
address=fdd2:cbf2:61bd:0:0:0:0:2
port=80
keys=deavmiWebServer.dat
i2cp.leaseSetEncType=0,4
From the man himself:
[13:30:52] <orignal> also you forgot to enable 4
[13:31:22] <orignal> i2cp.leaseSetEncType=0,4

...

[13:39:06] <orignal> 0 is old slow ElGamal
[13:39:16] <orignal> 4 is new ECIES-x25519
[13:39:33] <~deavmi> ah
[13:39:34] <~deavmi> thanks
[13:39:36] <orignal> also another logic
[13:39:48] <orignal> like tags are calculated rather than being sent
[13:39:59] <orignal> simply speaking 4 is much faster 0
Now let’s enable the web server so we can get that destination address. In your ~/.i2pd/i2pd.conf add the following:
# Web server settings
http.enabled=true
http.address=0.0.0.0
httpport=8182
http.auth=yes
http.user=deavmi
http.pass=bro
http.strictheaders=no
This will enable the web interface on port 8182 and bound to all IPv4 addresses (0.0.0.0) and will also use HTTP authentication to only allow you to see and modify your node via the web interface with the respective username (http.user) and password (http.pass).
The last part is to allow a connection to the web interface from any IP, other than just from the node itself (from 127.0.0.1).
Now if you visit your node’s web interface you should be greeted to something like this:
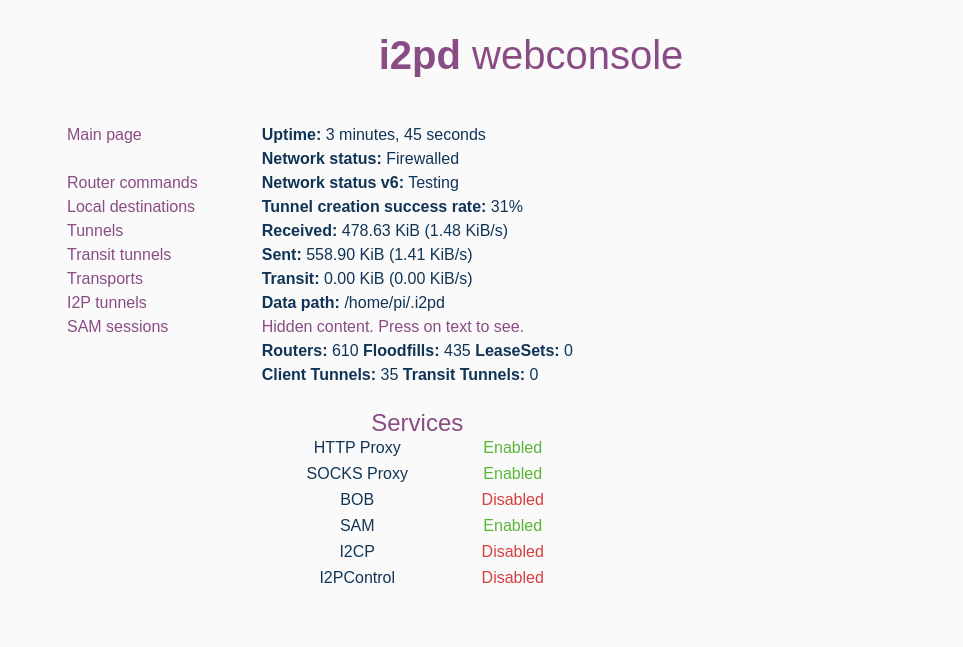
Going to the I2P Tunnels page in the sidebar:
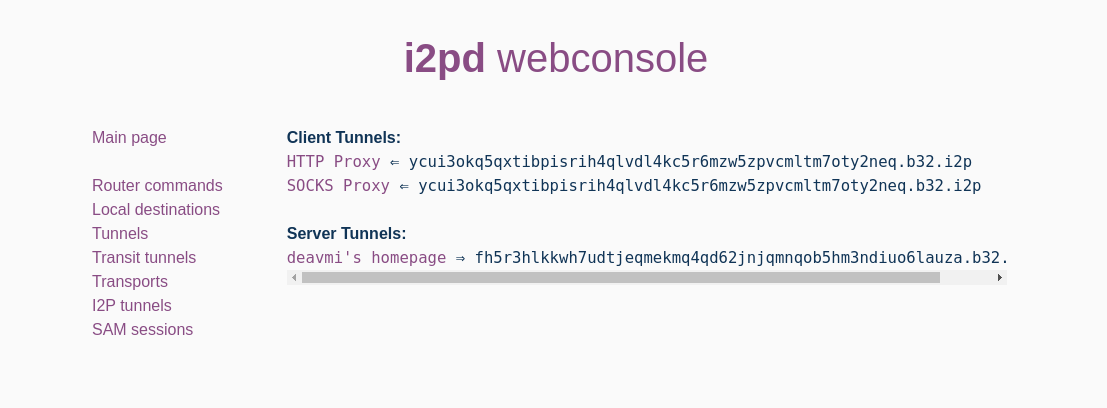
And now this is the destination address fh5r3hlkkwh7udtjeqmekmq4qd62jnjqmnqob5hm3ndiuo6lauza.b32.i2p - give it to your I2P users and they will be able to reach my site, for example using I2P’s built-in HTTP client tunnel proxy:
HTTP_PROXY=http://127.0.0.1:4444 surf http://fh5r3hlkkwh7udtjeqmekmq4qd62jnjqmnqob5hm3ndiuo6lauza.b32.i2p
And here it is:
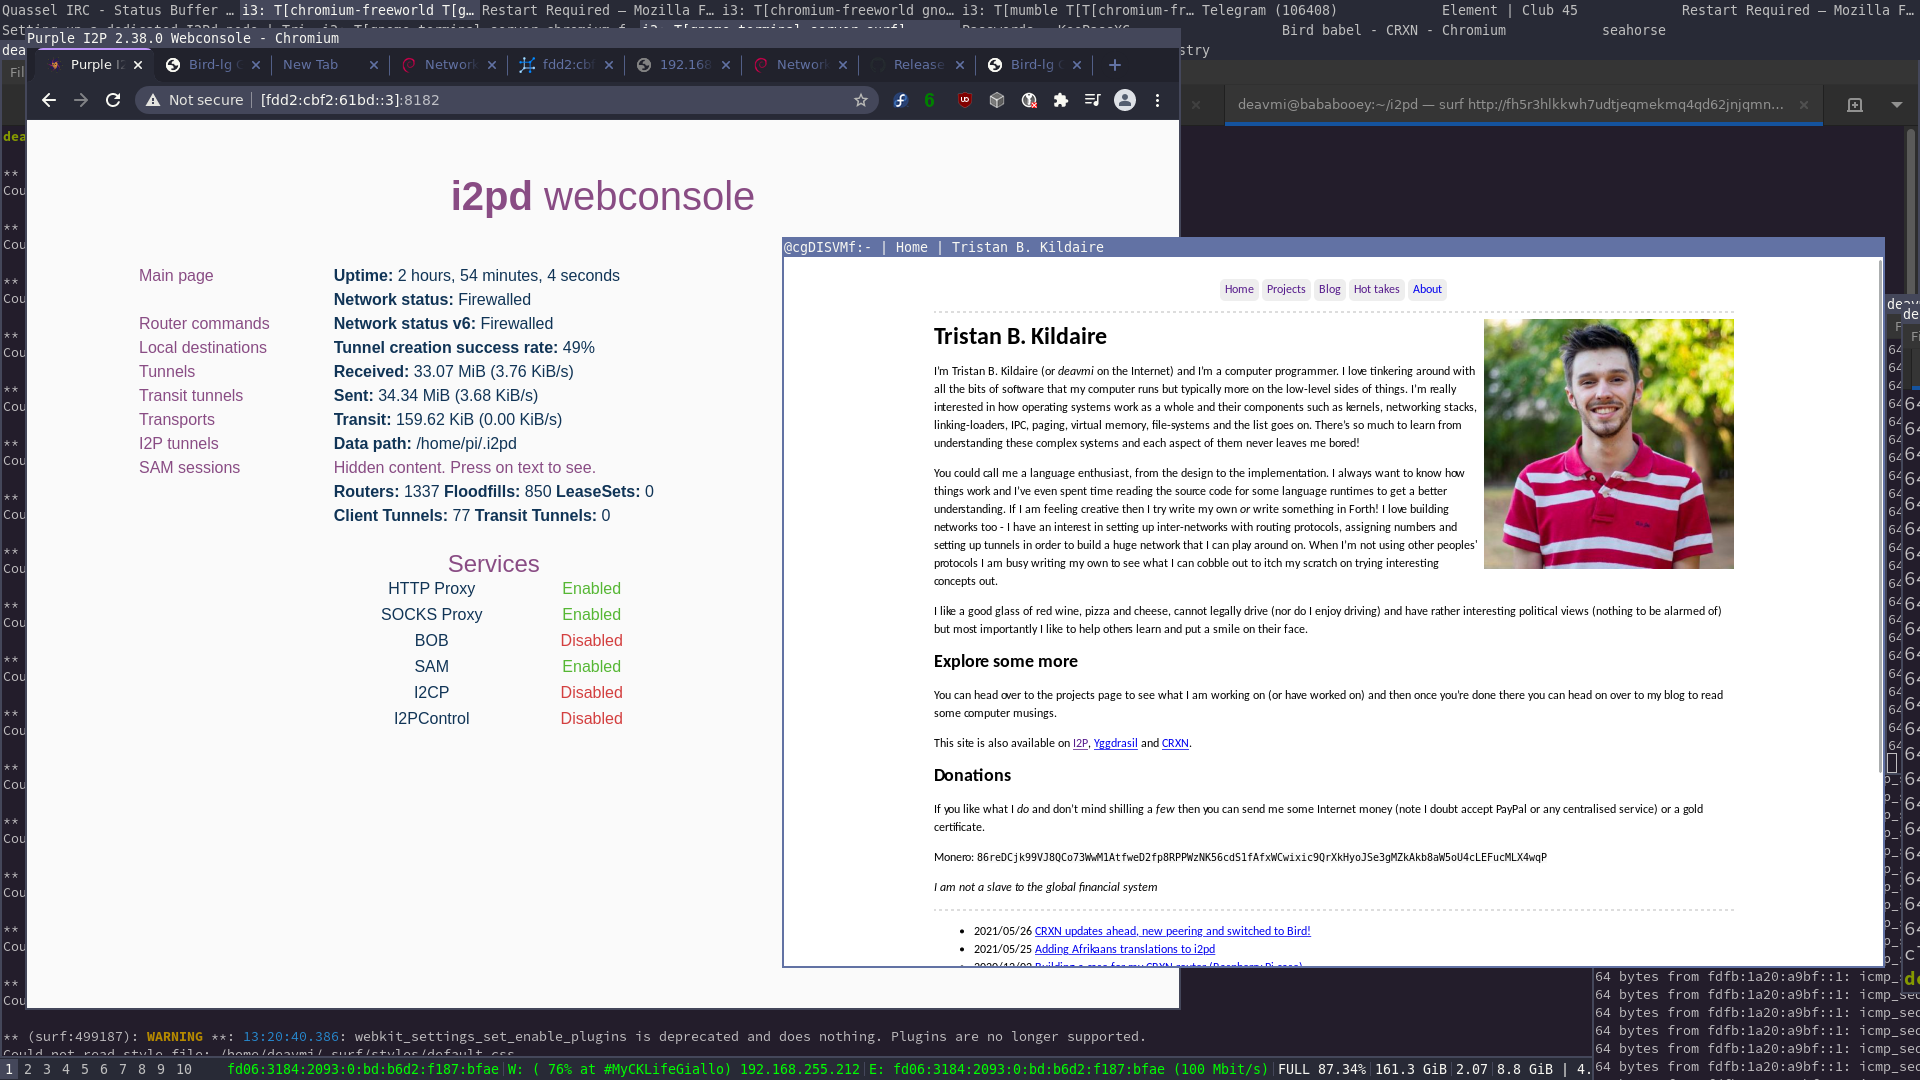
Remember that you want to help the I2P network grow! So the more ways you can have your router available - the better!
Some ways of this would be:
- Enabling IPv6
- I already did this as you will see
Network Status (IPv6)in the screenshot above
- Enabling Yggdrasil (if you have it installed)
Enabling IPv6 is very easy, just add this to your ~/.i2pd/i2pd.conf:
# Enable IPv6 I2P routing
ipv6=true
If you have Yggdrasil installed then you can enable I2P routing over Yggdrasil with the following additional lines to your configuration:
# Enable Yggdrasil routing
meshnets.yggdrasil=true
meshnets.yggaddress=200:c35f:2490:4860:1087:f7ac:200a:366
The second line (meshnets.yggaddress) is your Yggdrasil address you want to announce to the network that the other I2P routers can connect via. You can get it by doing ifconfig tun0 (assuming Yggdrasil has made a tunnel interface named tun0) and then copying the inet6 address:
pi@raspberrypi:~ $ ifconfig tun0
tun0: flags=4305<UP,POINTOPOINT,RUNNING,NOARP,MULTICAST>  mtu 65535
        inet6 200:c35f:2490:4860:1087:f7ac:200a:366  prefixlen 7  scopeid 0x0<global>
        inet6 fe80::531a:189:8049:a29d  prefixlen 64  scopeid 0x20<link>
        unspec 00-00-00-00-00-00-00-00-00-00-00-00-00-00-00-00  txqueuelen 500  (UNSPEC)
        RX packets 5  bytes 480 (480.0 B)
        RX errors 0  dropped 0  overruns 0  frame 0
        TX packets 5  bytes 240 (240.0 B)
        TX errors 0  dropped 0 overruns 0  carrier 0  collisions 0
Now your node should be available for I2P routing over the Yggdrasil network.
Final details
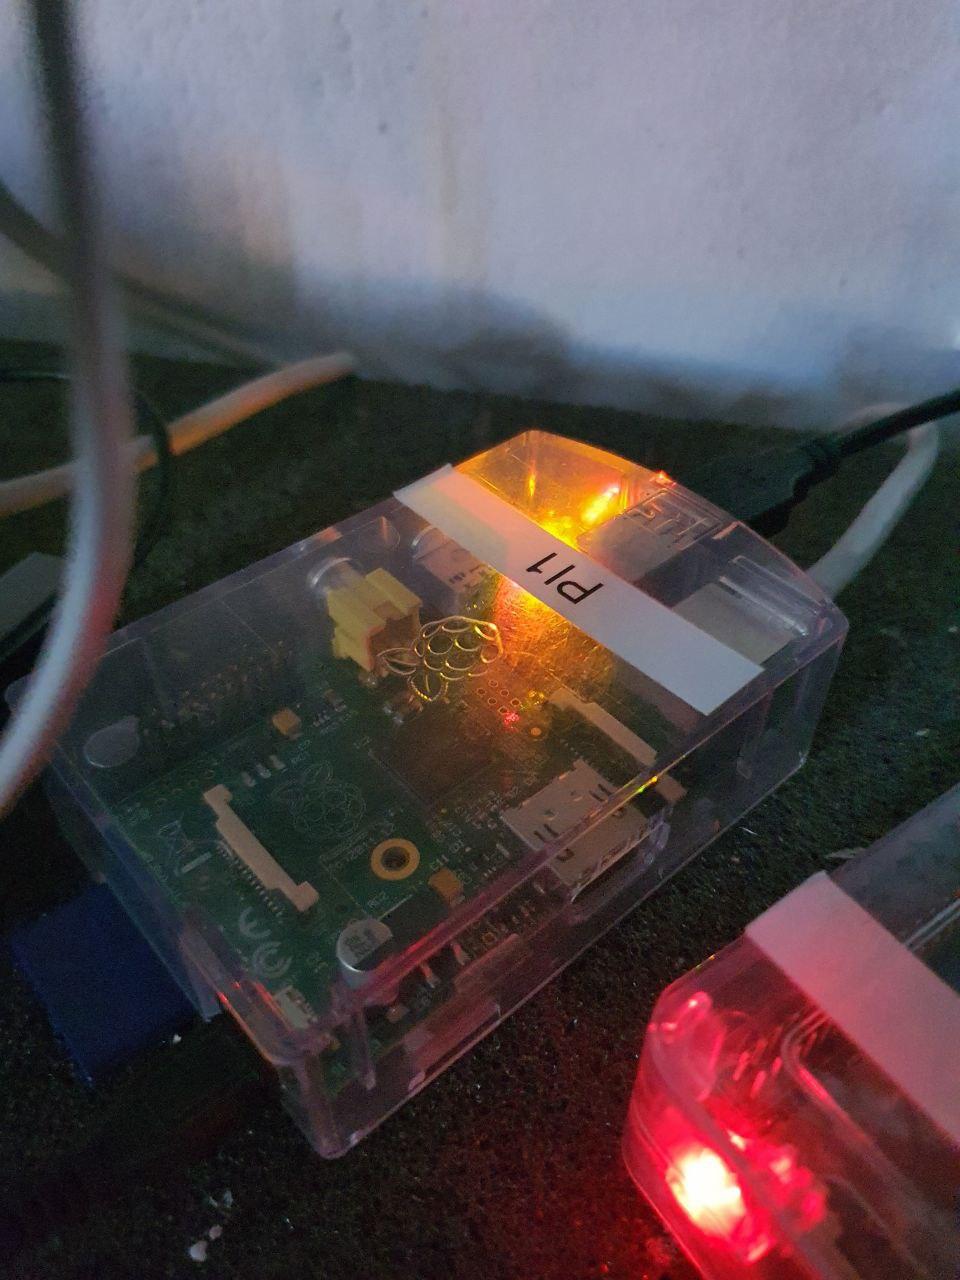
My I2pd router
We want to make the i2pd daemon start on boot, assuming you’re on a systemd-based distribution then do the following.
cd /etc/systemd/system
sudo nano i2pd.service
In this file place the following:
[Unit]
Description=i2pd
Wants=network.target
After=network.target

[Service]
User=pi
ExecStart=/home/pi/i2pd/i2pd
Restart=always
TimeoutStopSec=5

[Install]
WantedBy=multi-user.target
Then save and exit and lastly enable the service to start on boot and start it now:
sudo systemctl enable --now i2pd.service
And now your I2P router is ready to go!
Configuring client tunnels
Other than the built-in HTTP proxy client tunnel that I2Pd provides one would also want to setup a client tunnel for the IRC server for example. This is very easy, on another I2Pd instance you would add the following to your ~/.i2pd/tunnels.conf file:
[lockdown.bnet IRC server]
type=client
address=127.0.0.1
port=80
destination=fh5r3hlkkwh7udtjeqmekmq4qd62jnjqmnqob5hm3ndiuo6lauza.b32.i2p
Where the destination is the address you found in the example with the HTTP I2P proxy client tunnel. It will be on a similiar page on the I2P tunnels page (found in the sidebar).
Here address is the address to bind the local socket to and the port is the port to bind the socket to. Your service will be available on 127.0.0.1:80.
Closing remarks

I2P, specifically i2pd, is a really important tool for those who value privacy. Yes, it may require sockets but for most applications that works fine. I of course would like to see some funcitonality similiar to that of lokinet’s whereby you match up DNS reqeusts with IPs in a private range that then map to the I2P tunnel address (of which would be the domain name, like hfdsfgyusb yuhgvhgh.i2p) in such a manner then that a mapping of hfdsfgyusb yuhgvhgh.i2p to 10.0.0.1 would imply that any packet then destined to 10.0.0.1 when sent over i2pd0 would then go to that router on the receiving end. Then it would have full IP support and things like UDP and raw sockets would work (or any new port-based protocol).
A photo from the creator of i2pd, the man - the mystery - Vasily Losev or orignal online. I requested he write something funny on it so he did, entitled “My favourite boer, Deavmi”. The mask is the inspiration of the I2Pd logo by the way.